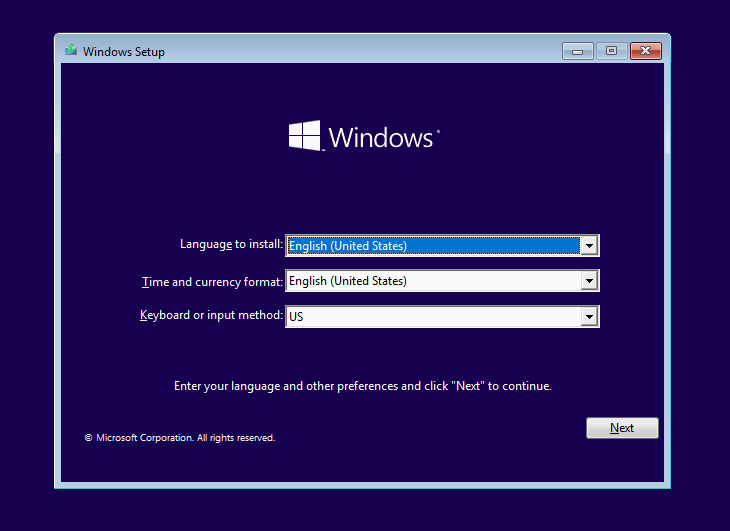
Yes, you can run Windows 10 or 11 inside LXD. It’s actually not that hard—just a few prep steps and some command-line magic. These instructions are written for Arch, but the process is nearly the same on other distros (package names may change a bit).
Last week, I attended a virtual talk hosted by Canonical on building a homelab with microservices. During the session, I discovered a new (to me) and very cool utility that’s perfect for managing virtual machines and containers from a centralized interface: LXD, or the Linux Container Daemon.
While LXD isn’t new—it’s actually been around since 2016—it’s still flying under the radar for a lot of homelab enthusiasts. After seeing it in action, I realized it’s a hidden gem worth exploring.
Why LXD Stands Out
LXD offers a unified way to manage both containers and VMs—whether through the command line (lxc), a web-based UI, or via REST APIs (though I won’t dive into the API side here).
This makes LXD an excellent choice for home labs because it lets you manage everything from one central “application” instead of juggling multiple tools for VMs and containers separately.
Features That Caught My Attention
Here are some of the standout features that make LXD so powerful:
Run System Containers
LXD can run full Linux distributions inside containers (unlike Docker, which is app-focused).
Containers behave like lightweight virtual machines.
You can run Ubuntu, Alpine, Debian, CentOS, etc., inside LXD containers.
Run Virtual Machines
LXD supports running full virtual machines (VMs) using QEMU/KVM.
This allows mixing containers and VMs on the same host with a single tool.
Build and publish your own custom container/VM images.
Networking
LXD provides built-in bridged, macvlan, and fan networking modes.
Supports IPv4 and IPv6, NAT, and DNS.
Resource Limits
Apply resource limits like CPU, RAM, disk I/O, network bandwidth.
Useful for multi-tenant or production environments.
Cluster Mode
LXD supports clustering — multiple nodes sharing the same configuration.
There’s a lot more that LXD can do, but these are the features that really stood out for my personal homelab use case.
Getting Started
LXD currently ships via Snap packages. You can easily install it by running the command below, and that will also install all the requirements:
sudo snap install lxd
Once installed, you’ll need to initialize it. Running lxd init will prompt a series of configuration questions (e.g., storage, network type, clustering, etc.). If you’re just setting things up for testing, feel free to use the same answers I did below — but it’s always a good idea to consult the official LXD Documentation for a deeper understanding:
$ sudo lxd init

Would you like to use LXD clustering? (yes/no) [default=no]:
Do you want to configure a new storage pool? (yes/no) [default=yes]:
Name of the new storage pool [default=default]:
Name of the storage backend to use (btrfs, ceph, dir, lvm, powerflex) [default=btrfs]: dir
Would you like to connect to a MAAS server? (yes/no) [default=no]:
Would you like to create a new local network bridge? (yes/no) [default=yes]:
What should the new bridge be called? [default=lxdbr0]:
What IPv4 address should be used? (CIDR subnet notation, “auto” or “none”) [default=auto]:
What IPv6 address should be used? (CIDR subnet notation, “auto” or “none”) [default=auto]: none
Would you like the LXD server to be available over the network? (yes/no) [default=no]: yes
Address to bind LXD to (not including port) [default=all]:
Port to bind LXD to [default=8443]:
Would you like stale cached images to be updated automatically? (yes/no) [default=yes]:
Would you like a YAML "lxd init" preseed to be printed? (yes/no) [default=no]:
The lxc command is a command-line client used to interact with the LXD daemon. To use the lxc command as a non-root user, you’ll need to add your user to the ‘lxd’ group:
sudo usermod -a -G lxd [my_user]
⚠️ Important Notes:
This change only takes effect after you log out and back in.
Adding a non-root user to the ‘lxd’ group essentialy gives root access to that user.
Configuring Access to the WEB UI
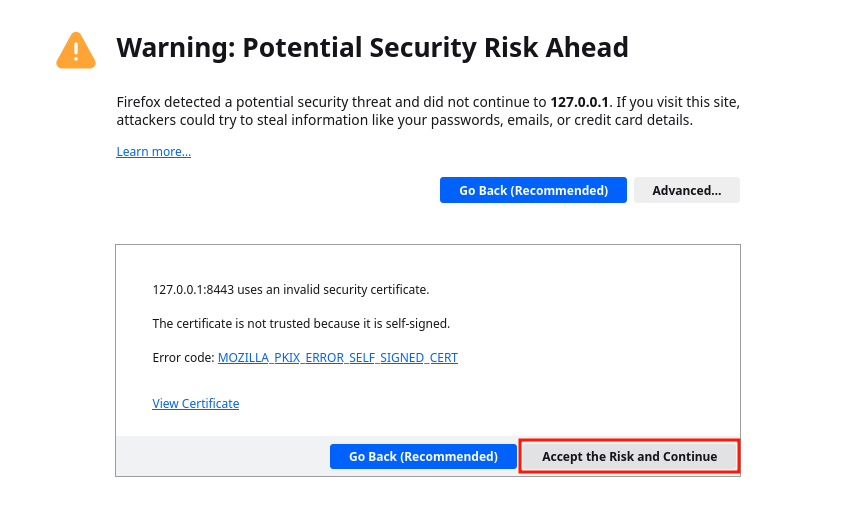
At this point, LXD should be running. You can now access the Web UI at ‘https://127.0.0.1:8443/'.
Since it uses a self-signed certificate, your browser will warn you. Just click “Accept the Risk and Continue” (or equivalent in your browser):
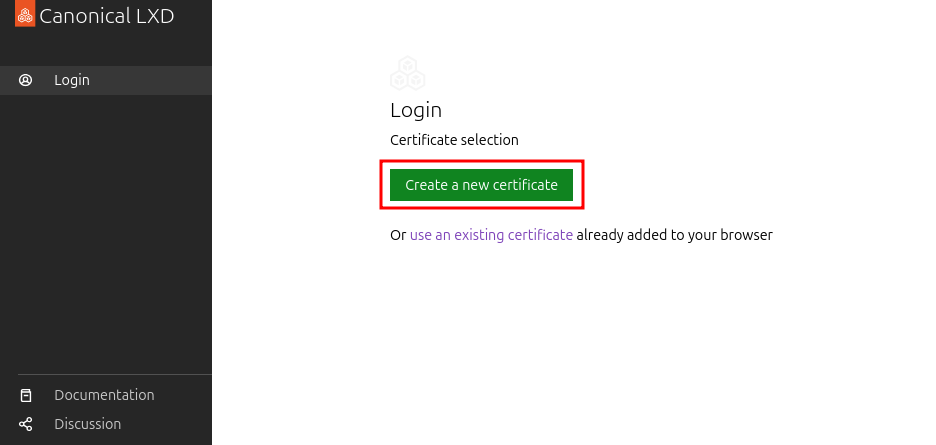
LXD uses certificate authentication, so you’ll need to generate and trust one.
a. Click “Create a new certificate”:
b. Then click “Generate”:
c. Enter a password for the certificate and click on “Generate certificate”:
d. Download the certificate and trust it from the terminal:
$ lxc config trust add Downloads/lxd-ui-127.0.0.1.crt
To start your firstcontainer, try: lxc launch ubuntu:24.04Orfor a virtual machine: lxc launch ubuntu:24.04--vm
f. To access the Web UI you’ll also need to import the .pfx file into your browser’s certificate store. Follow your browser’s instructions for importing client certificates:
g. Once imported, restart your browser and visit ‘https://127.0.0.1:8443/' again — you should be logged in automatically:
Additional Configuration
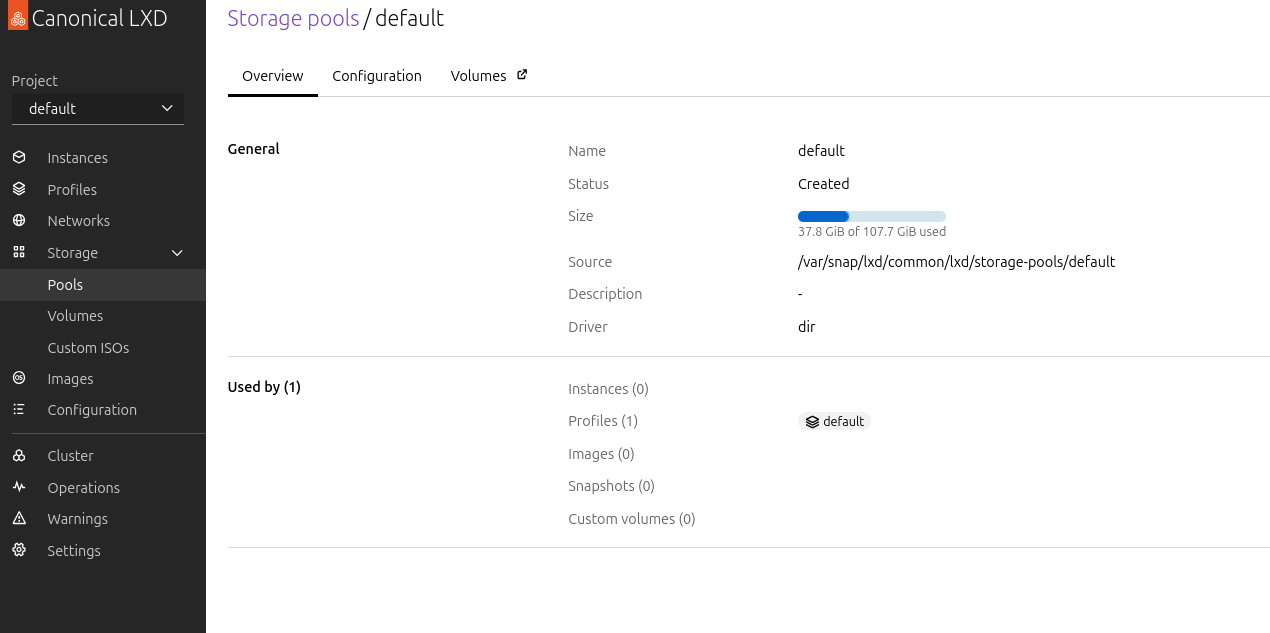
By default the storage, when ‘dir’ was set as type, will be inside the storage for the LXD snap (/var/snap/lxd/common/lxd/storage-pools/default). You will probably want to change that. Unfortunatelly you can’t change the default location, so we’ll just add a new one and set it to default.
Let’s make this change via command line.
a. First create a new volume pool (I created mine in /mnt/storage2/VMs/lxd):
$ lxc storage create main dir source=/mnt/storage2/VMs/lxd

Storage pool main created
b. You can check that it was created with:
$ lxc storage list

+---------+--------+------------------------------------------------+-------------+---------+---------+
|  NAME   | DRIVER |                     SOURCE                     | DESCRIPTION | USED BY |  STATE  |
+---------+--------+------------------------------------------------+-------------+---------+---------+
| default | dir    | /var/snap/lxd/common/lxd/storage-pools/default |             | 1       | CREATED |
+---------+--------+------------------------------------------------+-------------+---------+---------+
| main    | dir    | /mnt/storage2/VMs/lxd                          |             | 0       | CREATED |
+---------+--------+------------------------------------------------+-------------+---------+---------+
c. Now let’s set it as the default pool:
lxc profile device set default root pool=[pool name]
When you create an instance, LXD automatically creates the required storage volumes for it, so I will not cover it here.
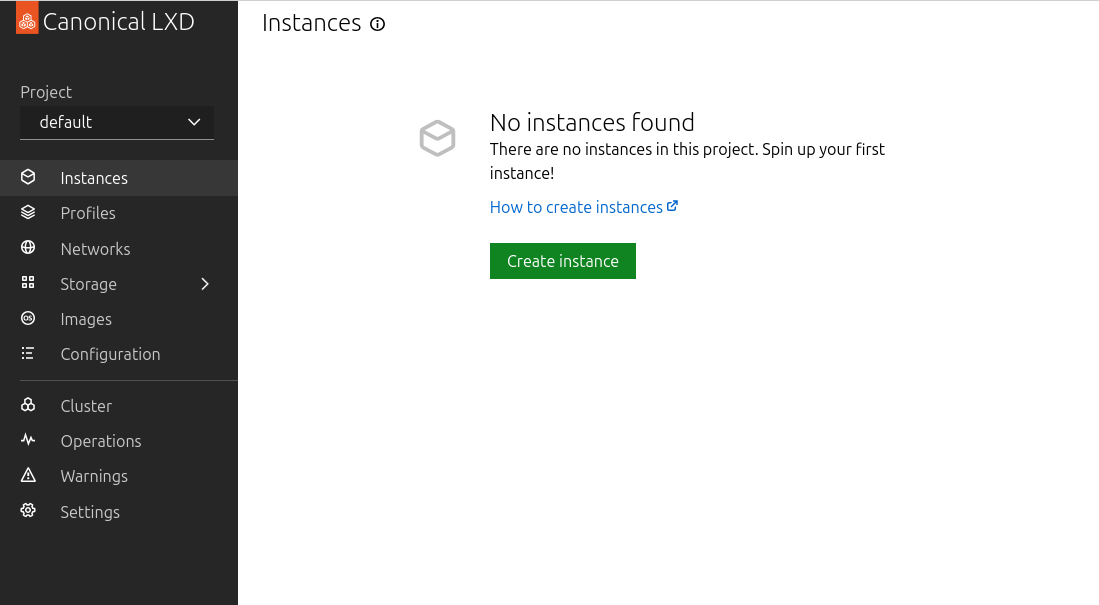
Creating Instances
Creating both container and VM instances via the UI is extremelly easy.
Containers
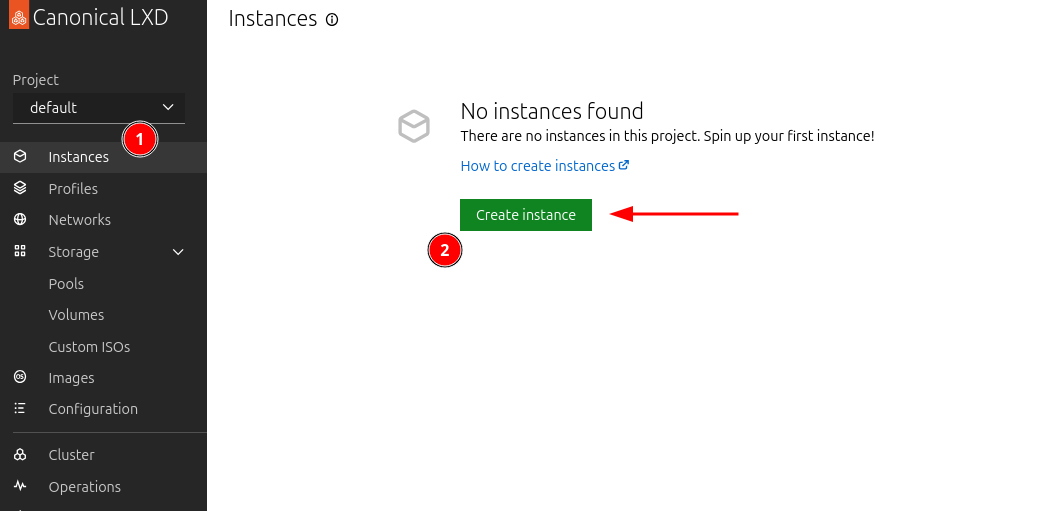
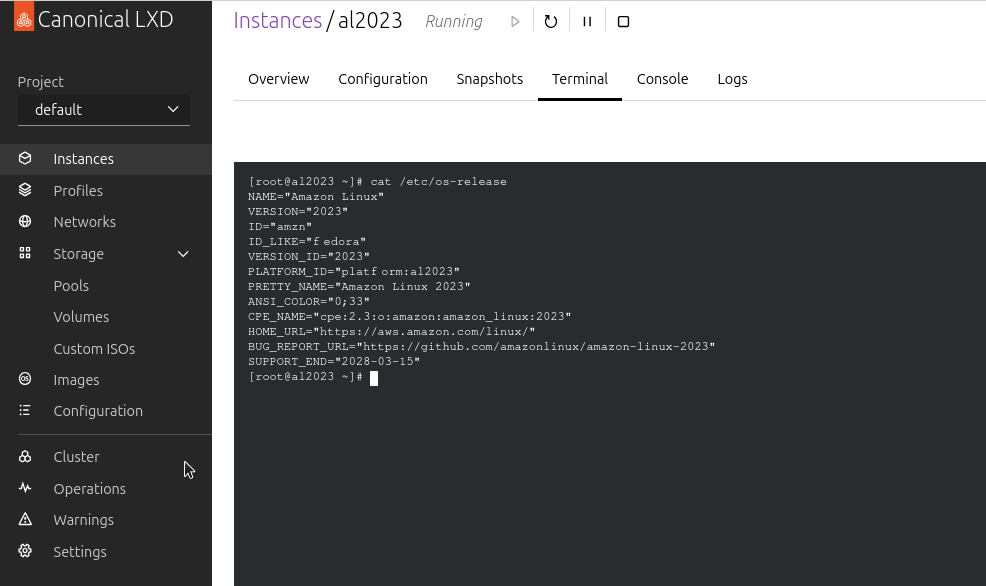
We are going to create a container based on the AmazonLinux 2023 image.
a. Back on the UI, browse to “Instances” and click on “Create instance”:
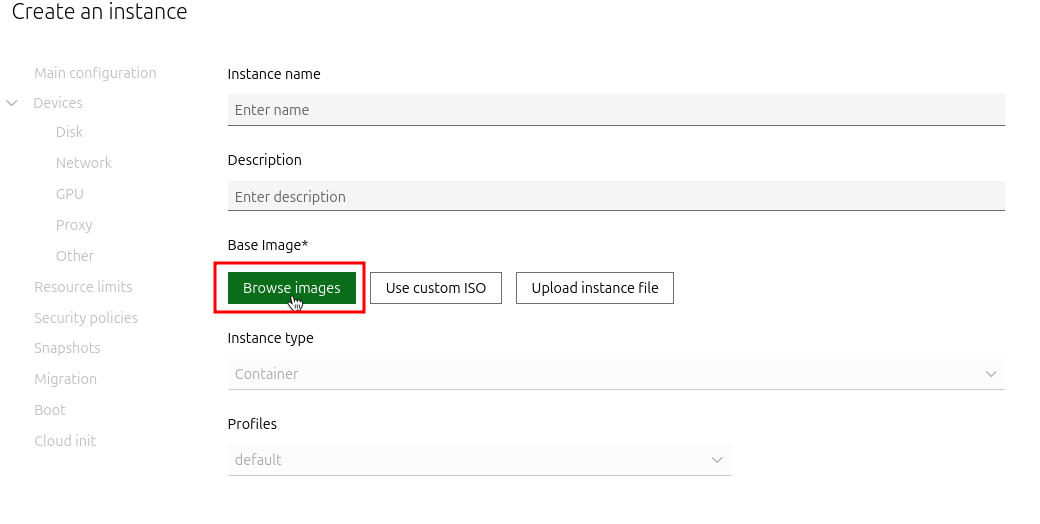
b. Click on “Browse images”:
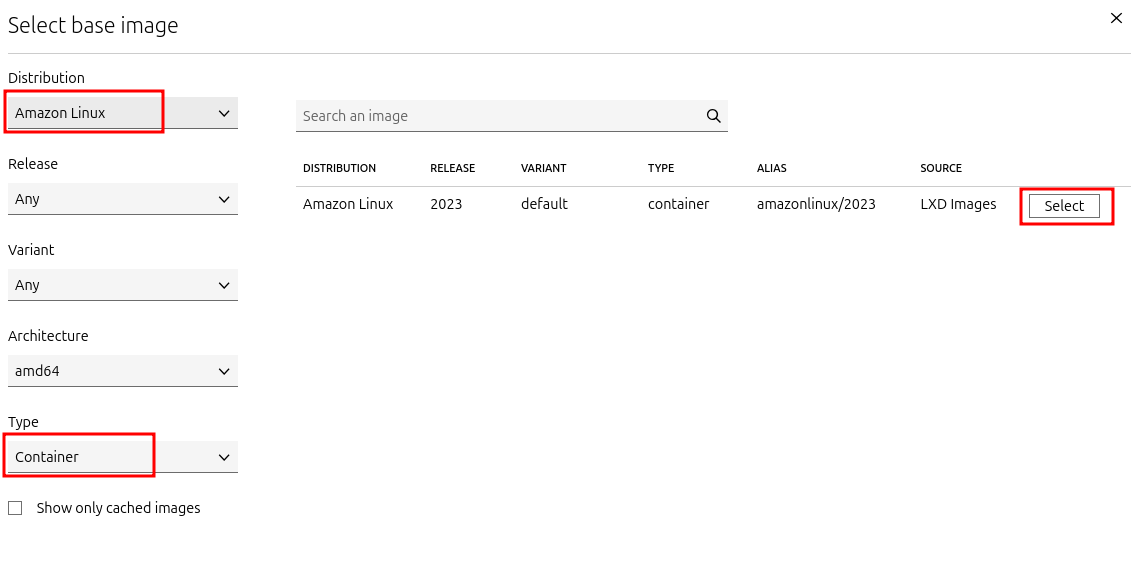
c. Filter the distribution by “Amazon Linux”, the type as “Container”, and click on “Select”:
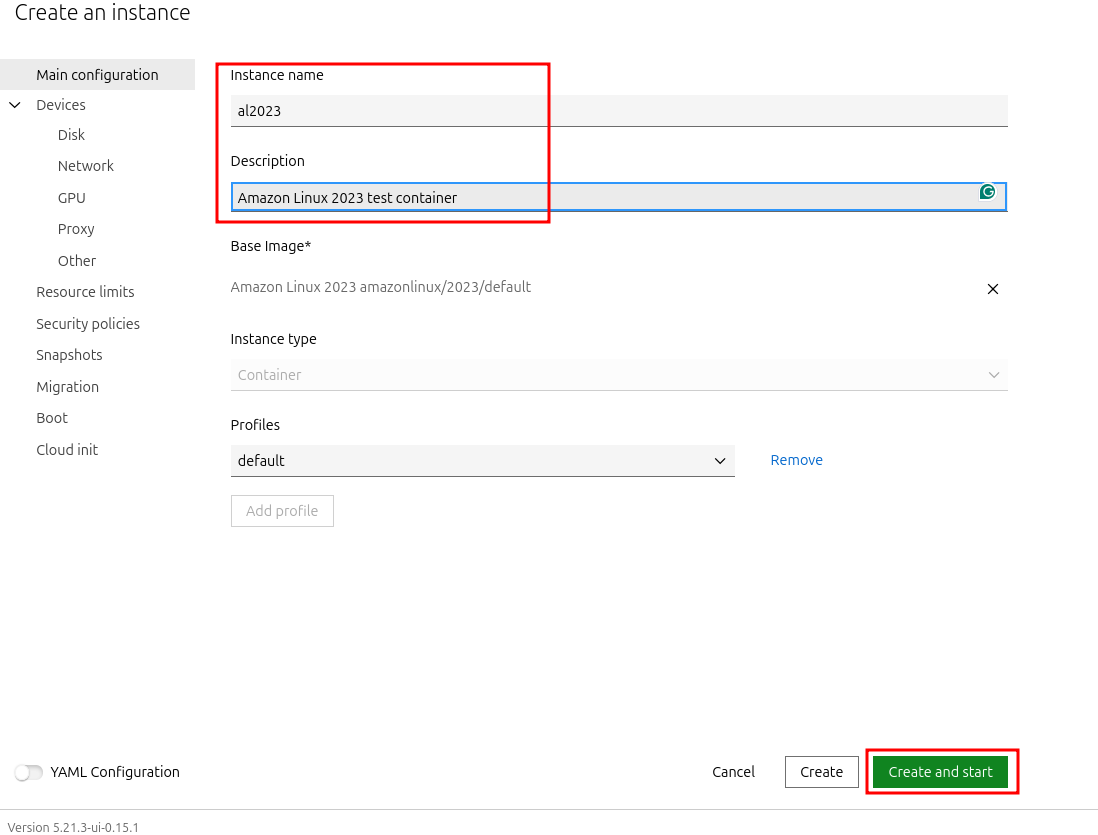
d. Give it a name and description and click on “Create and start”:
Tip: Don’t forget to poke around the options on the left next time you create an instance.
It should only take a few seconds for your container to be created and start running. You can access the container from the “Terminal” tab:
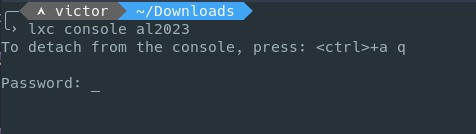
You can also access it via the terminal with lxc console, however that will require a password:
VMs
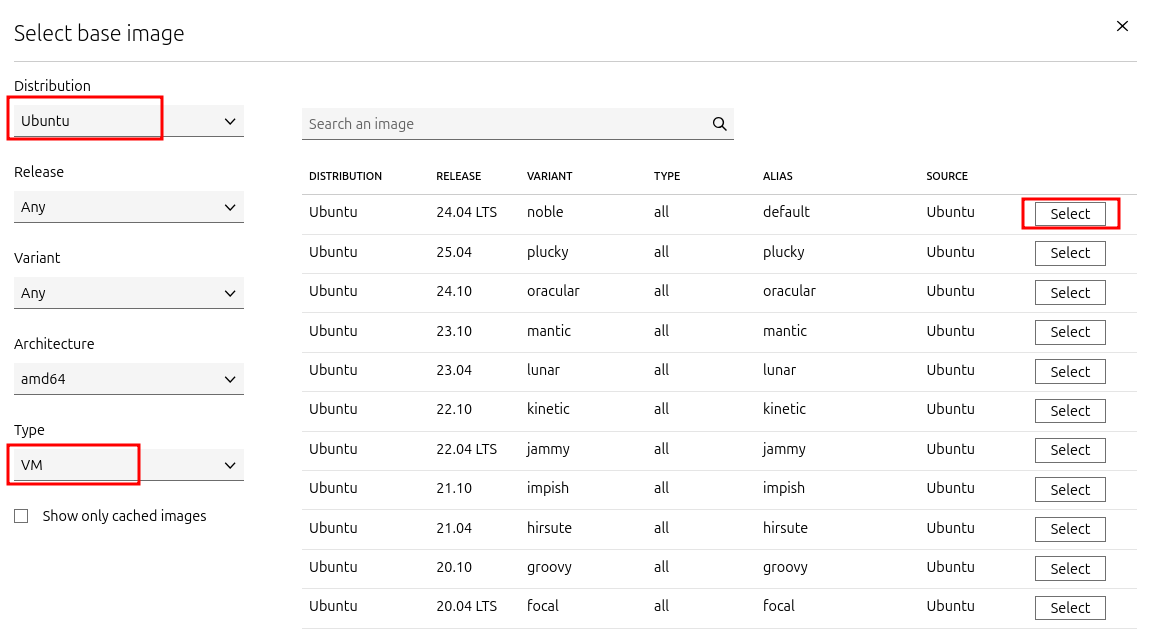
We are going to create an Ubuntu VM with graphical interface.
a. Repeat the same steps as before, but now select Ubuntu as the distribution, VM as the type, and a LTS version:
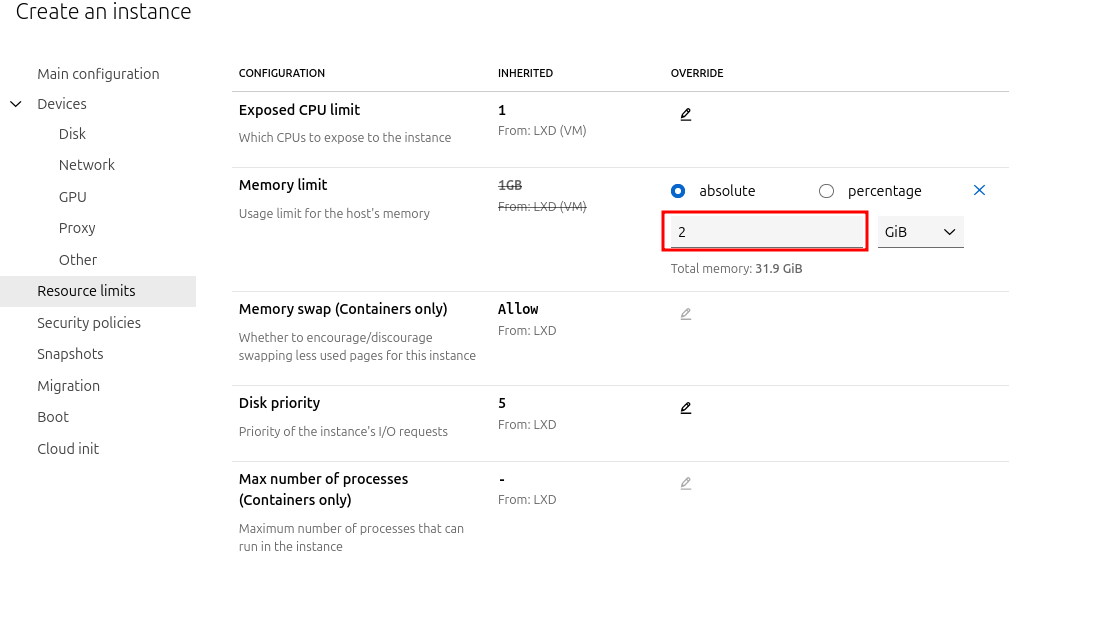
b. Give it a name/description, and under “Resource limits” set the memory limit to ‘2 GiB’. Then click on “Create and start”:
c. Once the VM is running, access the terminal tab the same way we did before and install ubuntu-desktop:
apt update && apt install ubuntu-desktop
Now is a great time to go grab a coffee… this will take a little while…
d. When the install is complete change the password for the ‘ubuntu’ user and reboot:
# passwd ubuntu

New password:
BAD PASSWORD: The password is shorter than 8 characters
Retype new password:
passwd: password updated successfully

# reboot
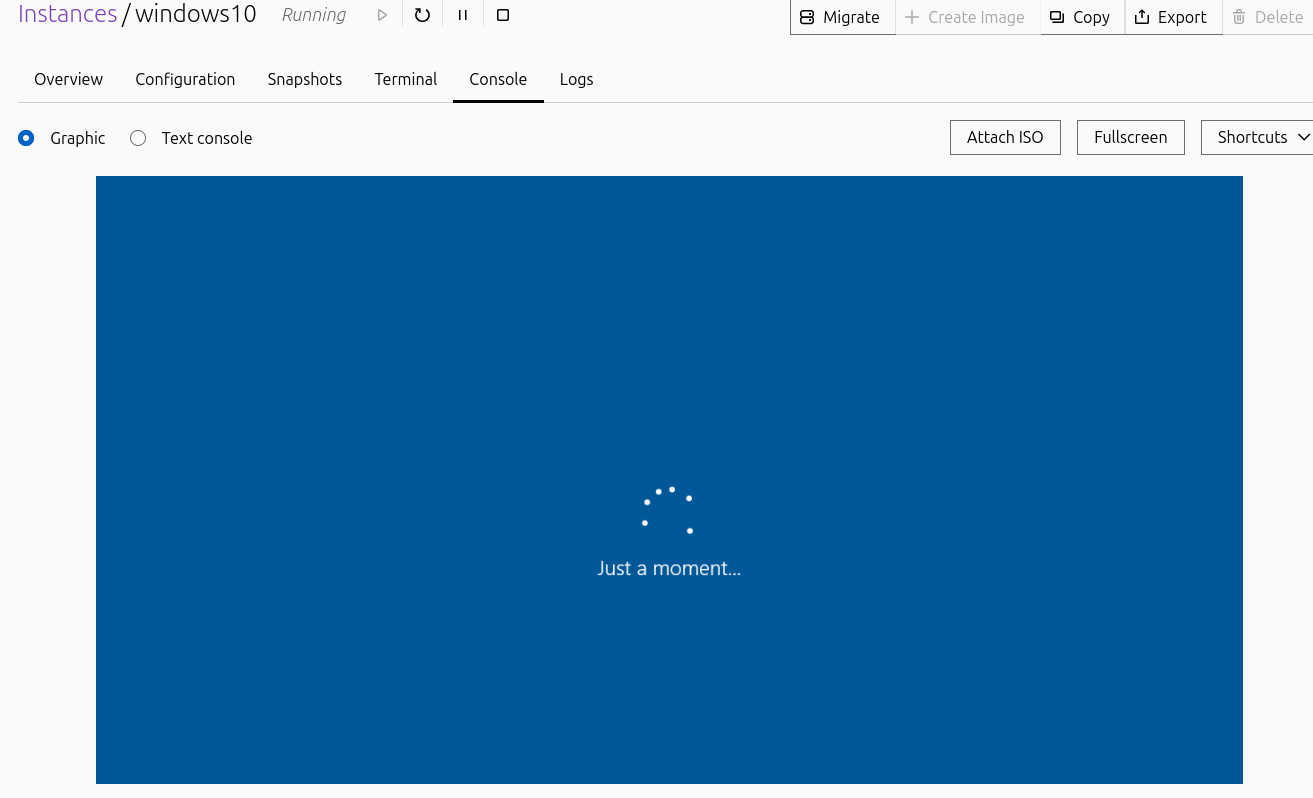
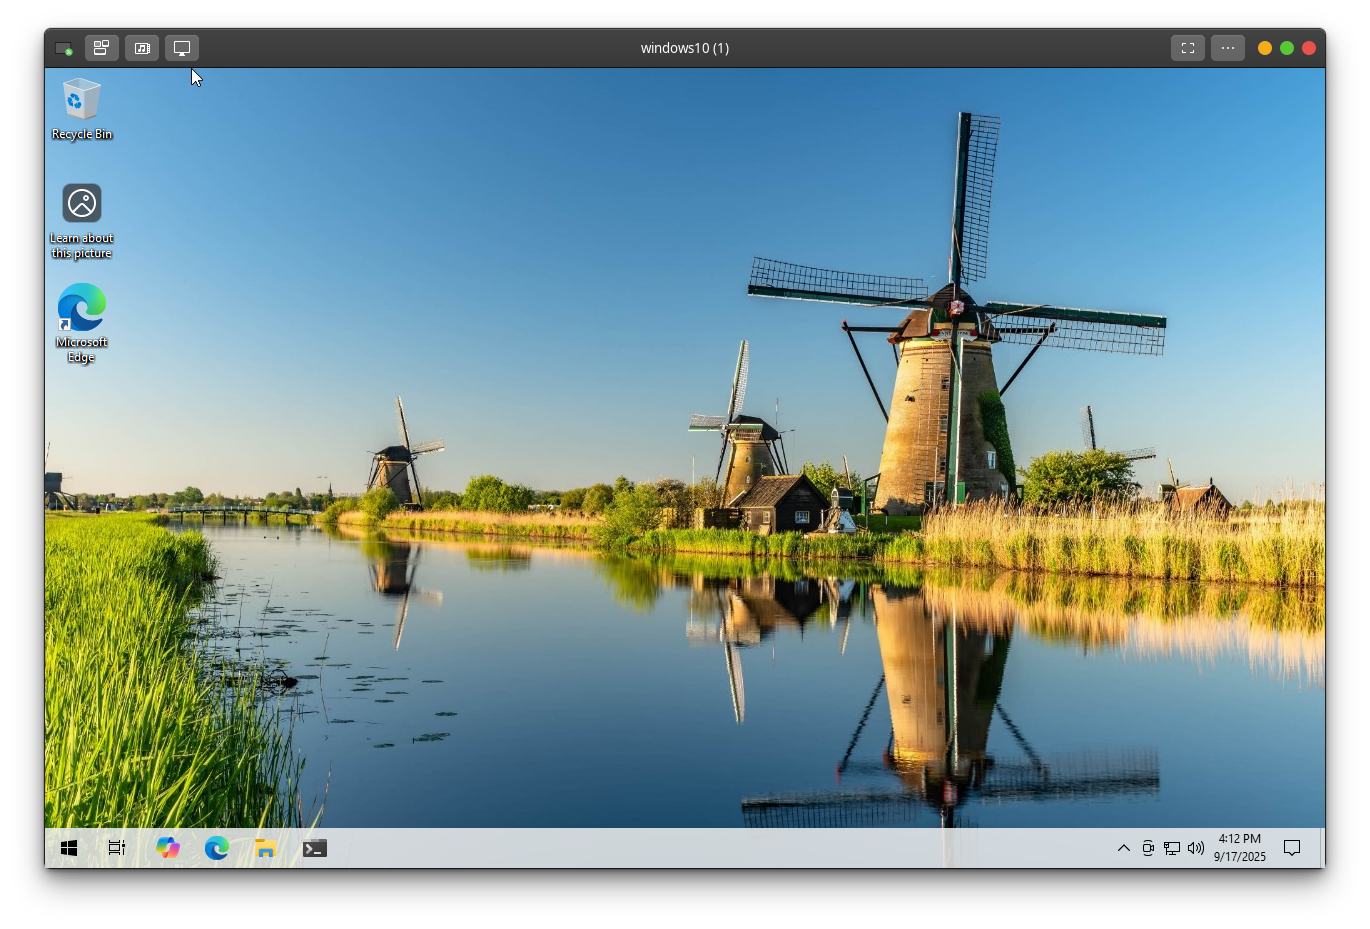
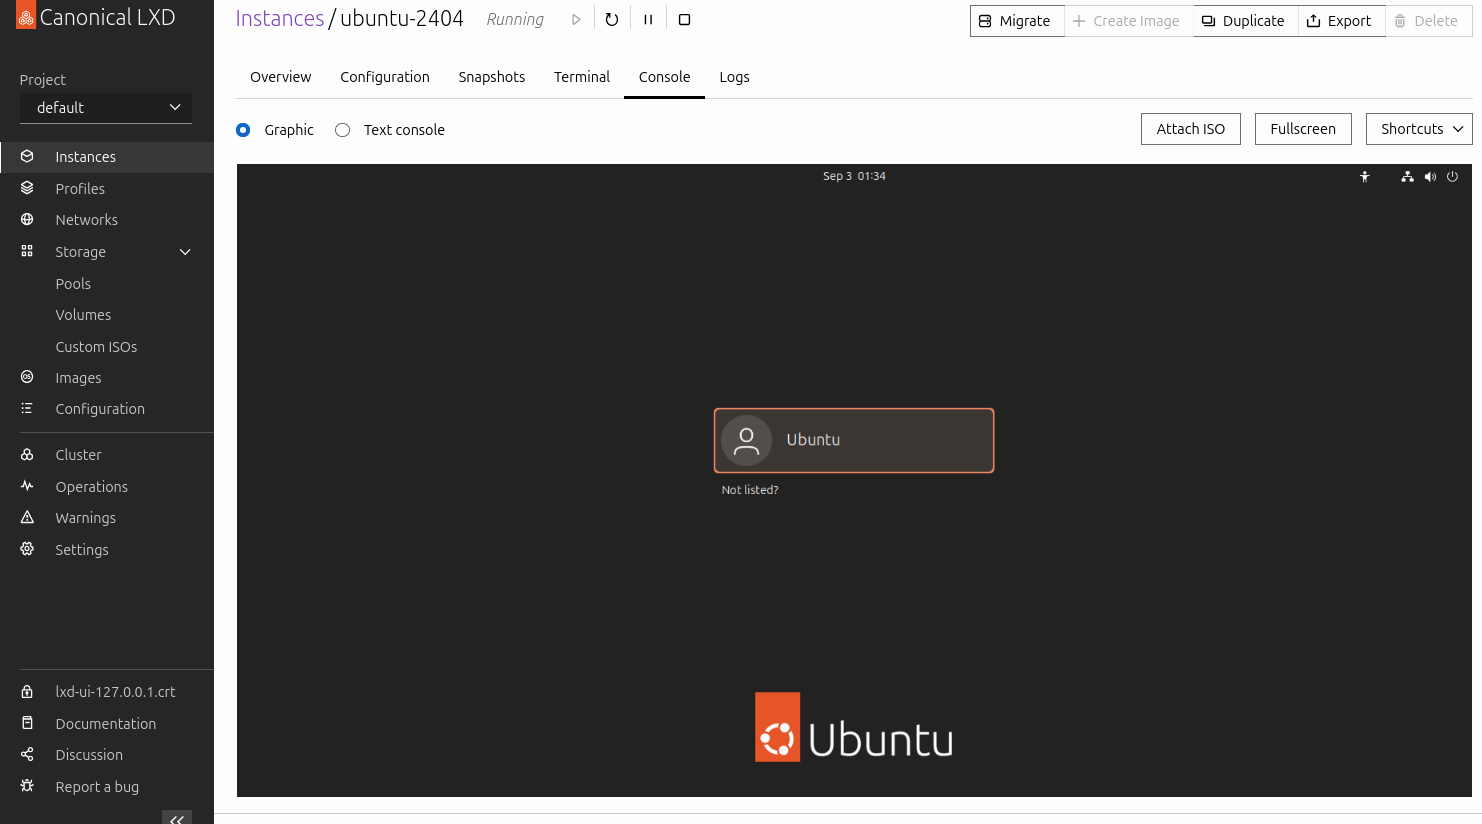
d. Go to the “Console” tab. You should see boot output and evetually be presented with the login window. You can login and use the VM from your browser:
And you can also access the VM graphical interface via the lxc connect command with the --type=vga flag:
lxc console ubuntu-2404 --type=vga
Conclusion
LXD might not be as flashy or widely known as Docker, but it fills a unique and valuable niche. It gives you the simplicity of containers and the power of full VMs — all under one roof. For homelabbers, that means less tool sprawl, cleaner management, and more flexibility to experiment.
Whether you’re just getting started with containers or looking to consolidate your virtualization setup, LXD is absolutely worth a try. With its web UI, clustering support, and straightforward setup, it can quickly become the backbone of a modern homelab.
Working as a Linux administrator often means being pulled in many directions and juggling a variety of technologies. That doesn’t leave much time to revisit the basics. Over time, work becomes repetitive, and we end up doing things the same way we learned years ago—without stopping to refine or discover smarter approaches.
With this series of posts, I hope to share tips and shortcuts that will help you work faster and smarter—and maybe even stand out among your coworkers by pulling off a few neat tricks.
Try these out at least once—and if you’re still stuck going to the office, print them out and stick them on your cubicle wall.
Today, we’re going to focus on Bash navigation and history.
Tab Completion
We all know that [TAB] can be used for both path and command completion, but I’m always surprised by how many admins who aren’t fully comfortable with the shell forget to use it. You’re not going to break anything or use up some imaginary “tab credits.” So use the hell out of tab completion—keep hitting that key until you land on what you need.
And here’s a bonus: don’t forget that [SHIFT]+[TAB] takes you back. So if you scroll past the option or path you were aiming for, just reverse it. Simple, fast, and much smoother than retyping.
Command Navigation
The commands below will help you navigate more efficiently and productively in a shell:
Ctrl+a - Move to the beginning of the line (same as [HOME])
Ctrl+e - Move to the end of the line (same as [END])
Ctrl+left/right - Move backward/forward one word
Ctrl+w - Delete the previous word
Alt+t - Swap the current word with the previous one
Esc+v - Edit the current line in an external editor (this is the edit-and-execute-command function). It uses the default editor set in $VISUAL or $EDITOR, which you can change if needed
Note: I remapped my edit-and-execute-command shortcut to Esc+i, which feels more comfortable for me.
Path Navigation
Navigating between directories is something sysadmins do constantly. Being able to move around quickly—and knowing a few tricks—can speed up your work exponentially. It can even impress your coworkers when they see how fast you glide through the shell.
Tab completion — We already covered this, but it’s worth repeating: use it and abuse it!
cd — Jumps straight back to your home folder. It sounds obvious, but many people forget this one.
cd - — Switches to the previous directory you were in. Great for bouncing back and forth.
cd ~ — Navigates to your home folder. The tilde (~) is very handy for quickly moving to subdirectories inside your home directory, e.g.: cd ~/Downloads
History
As you probably already know, history lets you go back to previous commands and re-execute them. Mastering how to quickly search and re-use previous commands saves you from tediously retyping the same things over and over.
Ctrl+r — Search your history for a specific string
Use [Shift] to go back if you skip past the command you wanted
Start typing the string before pressing Ctrl+r to act as a filter and only see matches for that string
!! — Re-execute the last command. Super handy when you forget sudo. Just type sudo !!
!$ — The last argument of your previous command. Useful if you mistyped a command and want to reuse its argument, e.g.:
userdle testuser   # typo
userdel !$         # fixes it using the last argument
It’s also great for running the last command with sudo, similar to !!
Alt+. — Inserts the last argument of your previous command directly into the current line (and shows it to you). It’s effectively the same as typing !$, but more interactive since it shows the result as you type. Keep pressing it to cycle through arguments from earlier commands.
💡 Tips:
Remember to use Esc+v to quickly open a previous command in your editor if it needs modification
Bash history can be customized to be even more powerful:
HISTTIMEFORMAT — Add timestamps to your command history. E.g.:
HISTSIZE and HISTFILESIZE — Increase how many commands are stored in memory and on disk
shopt -s histappend — Append to your history file instead of overwriting it. This way you don’t lose commands when multiple shells are open
Conclusion
That wraps up our quick dive into Bash navigation, history, and some handy shortcuts to speed up your workflow. Try them out, and stay tuned—there’s plenty more cool stuff coming in the next posts!
logrotate is a system utility designed to manage log files, ensuring that logs don’t consume excessive disk space by rotating, compressing, and removing old logs according to user-defined rules. This post will help you get familiar with logrotate configuration and usage.
By configuring and running logrotate effectively, you can automate log management, saving space, and ensuring your logs stay manageable over time.
Main Config
The primary configuration file for logrotate is located at /etc/logrotate.conf. It sets default values and contains the directory for additional configuration files (typically /etc/logrotate.d):
# see "man logrotate" for details# rotate log files weekly
weekly
# keep 4 weeks worth of backlogs
rotate 4
# create new (empty) log files after rotating old ones
create
# use date as a suffix of the rotated file
dateext
# uncomment this if you want your log files compressed#compress# RPM packages drop log rotation information into this directory
include /etc/logrotate.d
# no packages own wtmp and btmp -- we'll rotate them here
/var/log/wtmp {
monthly
create 0664 root utmp
minsize 1M
rotate 1
}
/var/log/btmp {
missingok
monthly
create 0600 root utmp
rotate 1
}
Configuration Files
The configuration file for each application or log location usually resides under /etc/logrotate.d/ and can contain various options to control how logs are handled.
Common Options
hourly – Rotate logs every hour (requires cron to run logrotate hourly).
daily – Rotate logs daily.
weekly [weekday] – Rotate logs once per week.
monthly – Rotate logs the first time logrotate is run in a month.
yearly – Rotate logs once a year.
rotate [count] – Defines how many rotated logs to keep. If set to 0, logs are deleted instead of being rotated.
minsize [size] – Rotate logs when they exceed a specific size, while also respecting the time interval (daily, weekly, etc.).
size [size] – Rotate only when log size exceeds the defined limit.
maxage [days] – Remove rotated logs after a specified number of days.
missingok – Continue without error if the log file is missing.
notifempty – Skip rotation if the log file is empty.
create [mode] [owner] [group] – Create a new log file with specified permissions, owner, and group.
compress – Compress rotated logs.
delaycompress – Delay compression until the next rotation cycle.
copytruncate – Truncate the log after copying it to the rotated file.
sharedscripts – Ensures that post-rotation scripts are executed only once.
postrotate/endscript – Define commands to be executed after log rotation:
To create a new log rotation rule, drop a configuration file into the /etc/logrotate.d/ directory. Ensure the scheduler for logrotate (either cron or systemd) is set up correctly.
Tip: Double-check your scheduler settings to ensure smooth log rotation.
Testing and Running Logrotate
Testing
Dry-Run
Before applying your configuration, you can test it with a dry-run using the -d option:
logrotate -d [my_config_file].conf
Verbosity
To view detailed steps, run logrotate with the -v option (useful with -d for dry-run testing):
logrotate -vd [my_config_file].conf
Scheduling Logrotate
logrotate can be scheduled using either cron or systemd. Here’s a quick overview of both methods:
Cron
When using cron, the logrotate job is typically defined in /etc/cron.daily/logrotate:
#!/bin/sh
/usr/sbin/logrotate -s /var/lib/logrotate/logrotate.status /etc/logrotate.conf
EXITVALUE=$?
if [ $EXITVALUE != 0 ]; then
/usr/bin/logger -t logrotate "ALERT exited abnormally with [$EXITVALUE]"fiexit 0
Systemd
Systemd can also manage logrotate via logrotate.timer and logrotate.service.
Managing log rotation through Ansible is a powerful way to automate log maintenance across multiple servers. Below is an example of how you can create a logrotate configuration using Ansible.
Ansible Playbook Example
This playbook installs logrotate (if it’s not already installed) and creates a new configuration file under /etc/logrotate.d/ for an application:
---- hosts:all gather_facts:true become:true vars: logrotate_conf:|
# Logrotate for application
/var/log/application/* {
# Keep 4 versions of file
rotate 4
# compress rotated files
compress
# Rotates the log files every week
weekly
# Ignores the error if the log file is missing
missingok
# Does not rotate the log if it is empty
notifempty
# Creates a new log file with specified permissions
create 0755 apache splunk
}
tasks: - name:Installslogrotate package: name:logrotate - name:Createslogrotateconfiguration copy: content:"{{ logrotate_conf }}" dest:/etc/logrotate.d/application owner:root group:root mode:'0644'
Explanation
logrotate_conf variable: Defines the configuration file for logrotate. It includes options such as file rotation frequency, compression, and file permissions.
rotate 4 – Keeps 4 old versions of the log.
compress – Compresses the rotated logs.
weekly – Rotates the logs every week.
missingok – Ignores errors if the log file is missing.
notifempty – Skips log rotation if the log is empty.
create 0755 apache splunk – Creates a new log file with specific permissions, owned by apache and splunk groups.
Installs logrotate: The task ensures that logrotate is installed on the target servers.
Creates logrotate configuration: The copy task creates the custom logrotate configuration file under /etc/logrotate.d/, with appropriate permissions.
By using Ansible, you can streamline the management of log rotation across your environment, ensuring consistency in how logs are maintained across all your systems.
Are you ready to level up your Linux game and wield the power of automation like a true DevOps ninja? Enter Ansible Console, the interactive command-line interface that puts the force of Ansible at your fingertips!
In this introduction post, I’ll take you on tour of Ansible Console, teaching you how to run ad-hoc tasks against your inventory with ease.
What is Ansible Console
Ansible Console is an interactive console for executing ad-hoc tasks against hosts defined in your Ansible inventory. It offers built-in command completion and a user-friendly interface, making it a versatile tool for system administrators and automation engineers.
Getting Started
To begin using Ansible Console, launch it by invoking ansible-console with the default inventory, or by specifying a custom inventory file.
Using the default inventory:
$ ansible-console
Specifying an inventory file:
$ ansible-console -i [inventory]
Once launched, the console prompt will display essential information about the current context, including group names, the number of hosts, and forks.
ansible@all (6)[f:10]$
		  |  |    |- forks
		  |  |- number of hosts
		  |- group
Keep an eye on the prompt color – if it turns red, it’s a subtle reminder that the become flag is set to true. Safety first, folks!
Inventory Management
Managing your inventory has never been easier. With Ansible Console, you can list hosts, groups, and even test connections with a flick of your wrist (or a tap of your keyboard).
Need to list all your hosts? No problem, just use the list sub-command:
ansible@all (6)[f:10]$ list
nut-pi
ubuntu-pi4
ubuntu-backup
ubuntu-lenovomini
freenas
pfsense
Want to flex your group management skills? Try this:
ansible@all (6)[f:10]$ list groups
all
centos
freebsd
linux
pfsense
raspberrypi
raspbian
rhel
truenas
ubuntu
ungrouped
And if you’re feeling a bit adventurous, why not test the connection to your hosts using the trusty ping or the ls command?
ls
ansible@all (6)[f:10]$ ls
freenas | CHANGED | rc=0 >>

pfsense | FAILED! => {
		"changed": false,
		"module_stderr": "Shared connection to 192.168.1.1 closed.\r\n",
		"module_stdout": "/bin/sh: /usr/local/bin/python: not found\r\n",
		"msg": "The module failed to execute correctly, you probably need to set the interpreter.\nSee stdout/stderr for the exact error",
		"rc": 127
}
ubuntu-lenovomini | CHANGED | rc=0 >>

ubuntu-backup | CHANGED | rc=0 >>

ubuntu-pi4 | CHANGED | rc=0 >>

nut-pi | CHANGED | rc=0 >>
ping
ansible@all (6)[f:10]$ ping
freenas | SUCCESS => {
		"changed": false,
		"ping": "pong"
}
pfsense | FAILED! => {
		"changed": false,
		"module_stderr": "Shared connection to 192.168.1.1 closed.\r\n",
		"module_stdout": "/bin/sh: /usr/local/bin/python: not found\r\n",
		"msg": "The module failed to execute correctly, you probably need to set the interpreter.\nSee stdout/stderr for the exact error",
		"rc": 127
}
ubuntu-lenovomini | SUCCESS => {
		"changed": false,
		"ping": "pong"
}
ubuntu-backup | SUCCESS => {
		"changed": false,
		"ping": "pong"
}
ubuntu-pi4 | SUCCESS => {
		"changed": false,
		"ping": "pong"
}
nut-pi | SUCCESS => {
		"changed": false,
		"ping": "pong"
}
Selecting Host or Group
You can select a host or a group with the ‘cd’ command (note how the prompt changes).
Host
ansible@all (6)[f:10]$ cd pfsense
ansible@pfsense (1)[f:10]$
Group
ansible@all (6)[f:10]$ cd ubuntu
ansible@ubuntu (3)[f:10]$
You can also use host patterns eg.: app*.dc*:!app01*
Configuration Customization
Ansible Console puts the power in your hands with customizable configuration options. Whether you need to specify the remote user, adjust the number of forks, toggle the become flag (and many more), Ansible Console has got you covered.
Ah, modules – the bread and butter of Ansible automation. With Ansible Console, you can unleash the full potential of Ansible modules right from your command line.
Use the help sub-command to get a list of available modules:
Explore the vast array of available modules or dive deep into specific modules for detailed information and usage examples. Simply provide the module name as an argument to help. And don’t forget that Ansible Console has built-in tab completion, so make sure to use and abuse it:
ansible@ubuntu (3)[f:10]$ help copy

Copy files to remote locations
Parameters:
	src Local path to a file to copy to the remote server.
	content When used instead of O(src), sets the contents of a file directly to the specified value.
	dest Remote absolute path where the file should be copied to.
	backup Create a backup file including the timestamp information so you can get the original file back if you somehow clobbered it incorrectly.
	force Influence whether the remote file must always be replaced.
	mode The permissions of the destination file or directory.
	directory_mode Set the access permissions of newly created directories to the given mode. Permissions on existing directories do not change.
	remote_src Influence whether O(src) needs to be transferred or already is present remotely.
	follow This flag indicates that filesystem links in the destination, if they exist, should be followed.
	local_follow This flag indicates that filesystem links in the source tree, if they exist, should be followed.
	checksum SHA1 checksum of the file being transferred.
	decrypt This option controls the autodecryption of source files using vault.
	owner Name of the user that should own the filesystem object, as would be fed to I(chown).
	group Name of the group that should own the filesystem object, as would be fed to I(chown).
	seuser The user part of the SELinux filesystem object context.
	serole The role part of the SELinux filesystem object context.
	setype The type part of the SELinux filesystem object context.
	selevel The level part of the SELinux filesystem object context.
	unsafe_writes Influence when to use atomic operation to prevent data corruption or inconsistent reads from the target filesystem object.
	attributes The attributes the resulting filesystem object should have.
	validate The validation command to run before copying the updated file into the final destination.
ansible@ubuntu (3)[f:10]$ yum check-update -q
 [ERROR]: Unable to build command: this task 'yum' has extra params, which is only allowed in the following modules: ansible.legacy.group_by, shell, ansible.legacy.set_fact, ansible.builtin.include_tasks, command, ansible.legacy.script, ansible.legacy.include,
ansible.builtin.group_by, ansible.legacy.shell, set_fact, ansible.builtin.shell, win_command, ansible.legacy.command, ansible.legacy.win_shell, ansible.builtin.set_fact, ansible.builtin.add_host, ansible.legacy.import_role, include_role, ansible.builtin.win_shell, include,
ansible.legacy.win_command, ansible.legacy.include_tasks, include_tasks, ansible.legacy.add_host, ansible.builtin.include_role, group_by, ansible.builtin.meta, ansible.builtin.raw, import_role, ansible.legacy.raw, ansible.builtin.command, ansible.legacy.include_vars, script,
win_shell, ansible.builtin.script, ansible.legacy.import_tasks, add_host, meta, ansible.builtin.import_tasks, ansible.windows.win_shell, ansible.builtin.include, ansible.windows.win_command, ansible.builtin.include_vars, raw, ansible.builtin.import_role, include_vars, import_tasks,
ansible.builtin.win_command, ansible.legacy.meta, ansible.legacy.include_role
But sometimes you may need to run a command that exists as a module instead of the module itself. This can easily be done with the !:
ansible@ubuntu-pi4 (1)[f:10]$ !apt list --upgradable
ubuntu-pi4 | CHANGED | rc=0 >>
Listing...
base-files/focal-updates 11ubuntu5.8 arm64 [upgradable from: 11ubuntu5.7]
gnome-shell-common/focal-updates 3.36.9-0ubuntu0.20.04.3 all [upgradable from: 3.36.9-0ubuntu0.20.04.2]
gnome-shell/focal-updates 3.36.9-0ubuntu0.20.04.3 arm64 [upgradable from: 3.36.9-0ubuntu0.20.04.2]
libnss-systemd/focal-updates 245.4-4ubuntu3.23 arm64 [upgradable from: 245.4-4ubuntu3.22]
libpam-systemd/focal-updates 245.4-4ubuntu3.23 arm64 [upgradable from: 245.4-4ubuntu3.22]
libsystemd0/focal-updates 245.4-4ubuntu3.23 arm64 [upgradable from: 245.4-4ubuntu3.22]
libudev1/focal-updates 245.4-4ubuntu3.23 arm64 [upgradable from: 245.4-4ubuntu3.22]
motd-news-config/focal-updates 11ubuntu5.8 all [upgradable from: 11ubuntu5.7]
systemd-sysv/focal-updates 245.4-4ubuntu3.23 arm64 [upgradable from: 245.4-4ubuntu3.22]
systemd-timesyncd/focal-updates 245.4-4ubuntu3.23 arm64 [upgradable from: 245.4-4ubuntu3.22]
systemd/focal-updates 245.4-4ubuntu3.23 arm64 [upgradable from: 245.4-4ubuntu3.22]
tailscale/unknown 1.58.2 arm64 [upgradable from: 1.56.1]
tzdata/focal-updates 2023d-0ubuntu0.20.04 all [upgradable from: 2023c-0ubuntu0.20.04.2]
udev/focal-updates 245.4-4ubuntu3.23 arm64 [upgradable from: 245.4-4ubuntu3.22]
WARNING: apt does not have a stable CLI interface. Use with caution in scripts.
Variables
Collection variables are not available by default because ansible-console, unlike ansible-playbook, doesn’t gather facts before running:
ansible@ubuntu-pi4 (1)[f:10]$ debug msg="{{ ansible_facts.architecture }}"
ubuntu-pi4 | FAILED! => {
		"msg": "The task includes an option with an undefined variable. The error was: 'dict object' has no attribute 'architecture'. 'dict object' has no attribute 'architecture'. 'dict object' has no attribute 'architecture'. 'dict object' has no attribute 'architecture'"
}
But fear not, you can manually invoke the setup module and either filter the values, or print them with the debug module:
With its intuitive interface and powerful functionality, Ansible Console offers a convenient way to execute ad-hoc tasks and manage your Ansible inventory interactively. By mastering Ansible Console, you can streamline your automation workflows and improve operational efficiency in your environment.